Hey Dolls...& Gents,
I've finally done a fair amount of shopping that has prepared me for the summer. I do not plan on slowing down (laughs)! However, just when I thought I'd run out of money my client contacted me and asked me to do her hair for her weekend vacay. While doing her hair I realized that I have made a lot of hair clients thanks to Tiffany, Patrice, and Kinesha. Now it's time that I show you why people come to me, exactly what I do, and why I'm trusted by my clients. I'd like to say THANK YOU to Melissa St. Jour for allowing me to post these pictures because this is pretty personal... Now let's begin!
These are the steps for completing a full weave. I charge only $100 for this style (students do recieve discounted prices) additional charges may be added for styling the hair. I have been doing hair extensions in my mother's salon for 3 years now. I have learned many new techniques from my mother and believe it or not but YOUTUBE has taught me ALOT as well!
1) I began by separating what she will leave out and I braid the rest.
As you can see her hair is a longer length naturally, she chooses to weave it
because it helps it to grow as it's resting underneath the extensions and avoiding
the heat and pressure of hot combs, blow dryers, perms, and other hair products.
I make sure the braids are tight and neat, although I will add a net.

2) Once I have completed braiding her hair I sew the ends of the braids
onto one another making sure they lay down perfectly to avoid bumps.
3) I cut and sew the net onto her braids.
As you can see the net allows me to perfectly sew across the braids without any gaps.
It's a much easier way to do weaves and it makes the appearance more natural and neat.
4) Finally, I sew the tracks onto the net.
The closer I get to the top of her head I prepare to close
the gap and use her hair to cover and blend with the tracks.
6) I use the hot comb for her edges to tame the hair and make it blend with the extentions.
7) Use Hair Clips to separate the hair...quickly
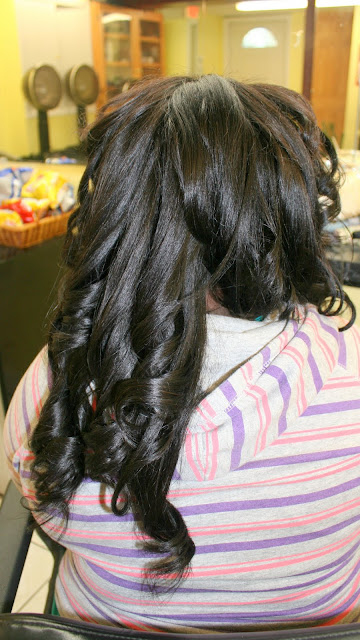
use a ceramic curling iron to make chunky spiral curls.
8) Start perfecting the curls and making them tighter.
Spray Holding spray onto the individual curls and use just a bit of oil sheen.
8) Continue pulling out curls that are falling;
recurl and use the holding spray.
9) Apply some bees wax to the edges of hair to help them lay down.
10) Turn your customer's seat to face the mirror
& ask her if there's anything she'd like you to fix.
A happy customer makes a happy salon
Inez's Hair Design
Contact me by leaving a comment
or emailing me at Agoldson89@yahoo.com
for an appointment :)


